

The roots of New England cuisine blend English tradition with Native American ingenuity. At the time the Pilgrims endured the harsh winter of 1620 in Plymouth Colony, they learned survival from the Wampanoag Indians. The natives taught them essential techniques to grow squash, beans and corn – ingredients that became the region’s cooking staples.
Traditional New England food showcases the region’s connection to its seaports and fishing industry through seafood, potatoes and dairy products. Massachusetts’s official state fish, cod, remains the life-blood of classic New England recipes. The sort of thing I love about this cuisine is its subtle flavoring – a characteristic shaped by 19th-century health reformers who supported milder food.
These 23 classic New England dishes tell stories of cultural exchange and resourcefulness. The region’s authentic recipes range from creamy clam chowder to Saturday night Boston baked beans – a tradition stemming from Puritan Sabbath rules. Each dish represents the rise of American regional cooking, from the 1930s Toll House cookie to the Irish-inspired one-pot New England boiled dinner. Local families still prepare these time-honored recipes in their homes today.
American Chop Suey

Image Source: Yankee Magazine
American Chop Suey has little resemblance to Chinese cuisine, despite its name. This beloved pasta casserole emerged in the early 1900s and became the life-blood of traditional New England food in the last sixty years.
American Chop Suey Ingredients
The classic recipe needs these hearty components:
- 1 pound elbow macaroni
- 1-2 pounds ground beef (85% lean preferred)
- 1 onion, diced
- 1 green bell pepper, diced
- Garlic cloves (2-4, minced)
- Tomato-based ingredients (sauce, paste and often canned tomatoes)
- Seasonings (typically Italian herbs, salt and pepper)
- Optional additions: Worcestershire sauce, celery, cheese
Regional recipes might include different ingredients. New Englanders believe bacon is “the secret” that lifts this dish beyond a simple pasta with meat sauce.
American Chop Suey Preparation Method
This one-pot wonder comes together easily:
A large pot helps brown the ground beef before draining excess fat. The next step adds diced onions, peppers, and celery until they soften. Garlic goes in last and cooks until fragrant.
The elbow macaroni needs separate cooking until al dente. The cooked pasta combines with the meat mixture, followed by tomato sauce, diced tomatoes and seasonings. Some recipes suggest adding uncooked pasta directly to the sauce with extra liquid.
Home cooks finish by stirring until the mixture heats through, and sometimes top it with grated cheese before serving.
Why American Chop Suey Is a Classic
Versatility and practicality earned this dish its classic status. American chop suey started with similarities to Chinese versions, mainly differing in gravy content. The recipe evolved around 1908 to include ground beef, pasta and tomatoes—creating today’s version.
American Chop Suey represents everything in classic New England cuisine—a forgiving and flexible dish served at family tables, school cafeterias and community potlucks. The recipe showcases New England’s cooking style: unpretentious, satisfying and adaptable to what’s on hand.
Other regions know it as “goulash,” but the name “American Chop Suey” remains uniquely New England.
Anadama Bread
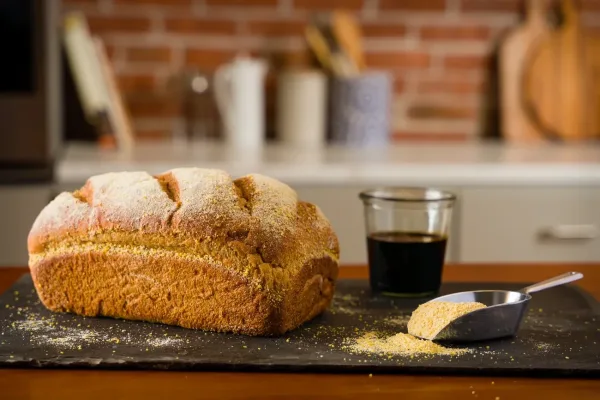
Image Source: Brod & Taylor Canada
Anadama bread combines cornmeal and molasses to create a sweet and nutty loaf that captures centuries of traditional New England food history. This bread has been a staple in New England kitchens since at least the mid-1800s. Records show it was trademarked as a bread brand in 1850.
Anadama Bread Ingredients
A classic New England recipe needs these key ingredients:
- Cornmeal (typically yellow cornmeal)
- Molasses (dark or “fancy” molasses)
- Flour (all-purpose or bread flour)
- Yeast
- Salt
- Butter (shortening was the historical choice)
- Water (milk appears in some recipes)
Each authentic version uses these basic ingredients with slight variations. Some old-school recipes add a bit of rye flour, though today’s bakers usually stick to wheat flour.
Anadama Bread Preparation Method
This bread stands out from others right from the first step. The process starts by mixing cornmeal with boiling water to create a thick, porridge-like base. Once it cools down a bit, butter, molasses and salt blend into this mixture.
Yeast gets activated in a separate bowl of warm water. The bubbling yeast mixture then combines with the cornmeal base. Gradual addition of flour creates the proper dough. A good 8-10 minutes of hand kneading makes the dough smooth and elastic.
The dough needs to rise for about 1-1.5 hours. Shaped loaves go into greased pans for a second rise before baking at 350-375°F for 30-45 minutes.
Why Anadama Bread Is a Classic
This bread earned its spot among classic New England recipes because it used ingredients that were available to early American households. Cornmeal and molasses were kitchen staples in Northeast cooking.
The bread’s staying power comes from its versatility. It makes great sandwiches, goes well with soups and turns into exceptional toast with just a pat of butter. New Englanders often call it the perfect bread for peanut butter and jelly sandwiches.
A soft, chewy interior and slightly crunchy crust give this bread its distinctive texture. These qualities, along with its sweet-and-earthy flavor, have kept it a beloved part of New England cuisine for generations.
Apple Cider Doughnuts

Image Source: Yankee Magazine
The sweet smell of apple cider doughnuts marks fall’s arrival in New England. Local orchards have turned this seasonal treat into a beloved regional food tradition. These special pastries stand apart from regular doughnuts because they use reduced apple cider that gives them a unique tangy-sweet taste of autumn.
Apple Cider Doughnuts Ingredients
These classic New England recipes need specific ingredients:
- Reduced apple cider (fresh cider boiled down to concentrate flavor)
- All-purpose flour
- Leavening agents (baking powder and baking soda)
- Warm spices (cinnamon and freshly grated nutmeg)
- Butter
- Granulated and brown sugars
- Eggs and buttermilk
- Vanilla extract
Fresh apple cider rather than apple juice makes these doughnuts special. The cider’s unfiltered nature adds richer flavor. The process starts by reducing 1-1.5 cups of cider to about 1/3 cup to create a concentrated syrup.
Apple Cider Doughnuts Preparation Method
The magic starts when fresh cider reduces to a thick syrup in about 20-30 minutes. This cooled reduction blends into a spiced batter with buttermilk that adds a pleasant tang to the doughnuts.
The dough needs chilling after mixing wet and dry ingredients. Bakers roll it to 1/2-inch thickness and cut doughnut shapes. Deep-frying in hot oil turns them golden brown on both sides.
Hot doughnuts get their final touch right after frying – a coating of cinnamon sugar. Some bakers prefer powdered sugar or a light glaze instead.
Why Apple Cider Doughnuts Are a Classic
These treats became popular in the early 1950s, yet they feel like an age-old tradition. New England’s fall season wouldn’t be complete without these doughnuts that have become central to the orchard experience.
The doughnuts offer a perfect balance of sweet and subtle savory notes. They taste amazing with hot apple cider or coffee. Each orchard takes pride in its family recipe.
Apple cider doughnuts have spread beyond farms to become seasonal stars in bakeries and cafes throughout New England. They’ve earned their place as a cornerstone of traditional New England food culture.
Baked Beans
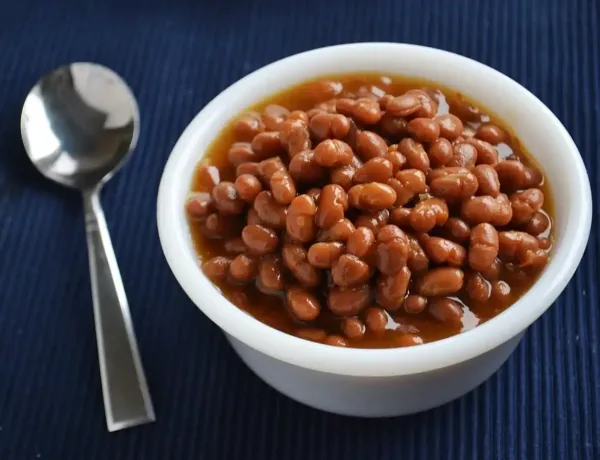
Image Source: Yankee Magazine
The humble bean pot has served as the life-blood of New England cuisine through the centuries. Baked beans became a cherished Saturday night tradition. Massachusetts recognized this cultural importance and made the Navy bean the state bean in 1993.
Baked Beans Ingredients
A genuine Boston baked beans recipe needs these key ingredients:
- 1 pound dried Navy beans (the traditional Boston choice)
- 1/2 pound salt pork (diced)
- 1/3 cup molasses (a signature sweetener)
- Brown sugar or maple syrup
- Dry mustard
- Onion (typically half an onion, uncut)
- Salt and pepper
Boston’s unique version uses molasses because the city stood as America’s molasses production hub. The traditional Boston recipe calls for Navy beans rather than yellow eye or kidney beans. These beans create the signature creamy texture and mild flavor that people love.
Baked Beans Preparation Method
The preparation starts with an overnight bean soak and a quick boil with baking soda softens the skins. The beans and salt pork go into a ceramic beanpot in layers.
A flavorful mix of molasses, sugar, mustard and salt gets added with hot water over the beans. The covered pot bakes in a relaxed 325°F oven for six hours. The beans soak up sweet-savory flavors and develop their classic dark color and thick sauce during this time.
The cook needs to check the cooking liquid regularly. Adding water keeps the beans moist without drowning them. This slow process lets molasses and bean starches create the rich, caramelized sauce that defines traditional New England food.
Why Baked Beans Are a Classic
Saturday nights in New England homes featured baked beans since colonial days. Religious practices before the 1800s meant no cooking on Sundays. This made slow-cooked beans the perfect weekend meal choice.
Home cooks and communal bakehouses prepared these beans in earlier times. Bakers would deliver finished beans from house to house for Sunday meals, usually served with brown bread.
These beans pack impressive nutritional value. Combined with corn and squash, they provide all nine amino acids, complex carbohydrates and vital nutrients.
Laugh at these Maine puns.
Boiled Lobster
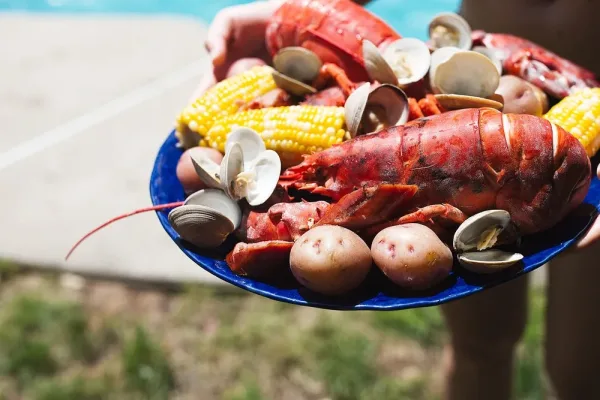
Image Source: Cooking with Cocktail Rings
Lobster stands as the quintessential symbol of New England cuisine, and the traditional boiled preparation showcases the sweet, delicate meat of this coastal delicacy. This classic New England recipe proves that a properly boiled lobster deserves its place at special occasion tables across the region.
Boiled Lobster Ingredients
Traditional boiled lobster shines through its simplicity:
- Live lobsters (typically one per person)
- Salt (enough to make the water taste like seawater)
- Melted butter for serving
- Lemon wedges
Notwithstanding that, many New Englanders turn this simple preparation into a complete feast by adding red potatoes, corn on the cob and sometimes kielbasa or littleneck clams to create a proper lobster boil. Some regional variations use beer in the boiling liquid to boost flavor without overpowering the delicate seafood.
Boiled Lobster Preparation Method
The right pot size matters—an 8-quart vessel fits one lobster, while a 16-quart pot handles two or three at once. Fill the pot three-quarters full with water and add about one tablespoon of salt per quart.
The water should reach a rolling boil. Hold each lobster by the body and lower it headfirst into the pot. Cover right away and watch for the water to return to boiling. Size determines cooking time: 7-10 minutes for a one-pound lobster, 8-12 minutes for a 1¼-pound specimen and 10-14 minutes for a 1½-pound lobster.
A perfectly cooked lobster shows a bright red shell and meat that changes from translucent to opaque white. The tail’s internal temperature should read 140°F for best results.
Why Boiled Lobster Is a Classic
Boiled lobster exemplifies traditional New England food at its finest—exceptional local ingredients shine with minimal handling. This preparation method remains unchanged through generations.
The shared experience of a lobster dinner creates lasting memories. Families gather around tables throughout New England’s coastal communities to crack shells, extract meat and dip each morsel into warm butter together.
Boston Cream Pie

Image Source: The Kitchn
Dating back to 1856, Boston Cream Pie stands as a delightful contradiction in New England cuisine – it’s a cake, not a pie. The Parker House Hotel in Boston (now the Omni Parker House) created this layered dessert that quickly captured regional hearts.
Boston Cream Pie Ingredients
This classic treat brings together three key components:
- Sponge Cake Base: Two golden layers made from eggs, sugar, flour, butter and milk. The best results come from hot milk sponge cake, which gives the perfect texture.
- Custard Filling: A smooth vanilla pastry cream that blends milk, cream, eggs, sugar, cornstarch and a hint of rum.
- Chocolate Glaze: The star topping that makes this dessert special – traditional recipes used fondant icing and melted chocolate, but modern bakers prefer semi-sweet chocolate ganache.
Boston Cream Pie Preparation Method
The magic starts with the sponge cake. Bakers beat egg yolks and whites with sugar until they form peaks, then gently fold in flour and melted butter. The cake bakes at 350°F for 20 minutes before cooling.
The custard filling comes next. Heat milk, cream and butter to boiling point, then mix in eggs, sugar and cornstarch. This rich pastry cream needs to thicken and chill before it goes between the cake layers.
The final touch is the chocolate topping. Heat chocolate and cream until they become smooth and pourable. Pour this glossy mixture over the cake’s top and let it cascade down the sides.
Why Boston Cream Pie Is a Classic
This dessert made history as one of the first treats to use chocolate as an ingredient rather than a drink. New England’s chocolate mills were rare during colonial times, which made chocolate desserts a luxury for the upper middle class.
The dessert’s cultural impact earned it the title of Massachusetts’ official state dessert in 1996. It won against tough competitors like Fig Newtons, Toll House cookies and Indian pudding. Students from Norton High School’s civics class championed the bill that made this designation official.
The dessert’s popularity continues because it offers the perfect mix of textures and flavors. The combination of tender cake, silky custard and rich chocolate creates an unforgettable traditional New England food experience.
15 classic French breakfast pastries.
Clam Chowder

Image Source: Simply Recipes
New England clam chowder serves as the life-blood of coastal cuisine. Breton fishermen created this dish by combining their daily catch with ingredients they had on hand. The hearty soup has grown into many regional styles. The white, cream-based New England version stands out as the most popular.
Clam Chowder Ingredients
A genuine New England clam chowder needs these basic ingredients:
- Clams (typically quahogs, littlenecks, or cherrystone varieties)
- Salt pork or bacon
- Onions
- Potatoes (traditionally russet or Yukon Gold)
- Clam juice
- Dairy (heavy cream, half-and-half, or whole milk)
- Butter
- Seasonings (predominantly salt and pepper)
Modern recipes might include celery, thyme, or bay leaves. Purists believe simple preparations work best to showcase the clam’s delicate flavor.
Clam Chowder Preparation Method
The cooking starts with diced salt pork or bacon cooked until crisp. Onions and sometimes celery cook in the flavorful rendered fat until soft. Some recipes call for a quick addition of garlic and thyme before mixing in flour to make a light roux.
The next step combines potatoes, clam juice and water. These simmer until the potatoes turn tender, usually 15-20 minutes. Fresh, frozen or canned clams go in later to keep them from getting tough.
The final touch adds cream or half-and-half and heats the clams through without boiling. Oyster crackers make the perfect accompaniment.
Why Clam Chowder Is a Classic
Clam chowder has exceeded its simple beginnings to become a symbol of traditional New England food. This beloved dish showcases the region’s resourcefulness and deep connection to the sea.
The rivalry between Manhattan’s tomato-based version and New England’s creamy style has existed since the early 20th century. New Englanders protect their white chowder with pride. A 1939 Maine bill tried to make adding tomatoes to chowder illegal – showing the region’s deep cultural bond with this classic New England recipe.
Fried Clams

Image Source: GreenPan
The story of fried clams started on July 3, 1916. Lawrence “Chubby” Woodman and his wife Bessie tried something new at their roadside stand in Essex, Massachusetts. A friend suggested they should dip fresh clams in batter and deep-fry them. This simple experiment created what would become a New England cuisine classic.
Fried Clams Ingredients
Real New England fried clams need just a few key items:
- Whole belly soft-shell clams (usually Ipswich clams from muddy flats)
- Evaporated milk or buttermilk for dipping
- Corn flour (not cornmeal or cornstarch)
- All-purpose flour
- Seasonings (salt, black pepper, occasionally cayenne)
- High-heat neutral oil for frying (traditionally lard)
Traditional recipes always call for whole belly clams instead of strips. Thomas Soffron later created the “clam strip” for people who preferred clams without the bellies. This changed how many places served the dish.
Fried Clams Preparation Method
Clean the clams really well to remove any shell bits or grit. Soak them in evaporated milk or buttermilk while you mix the corn flour, all-purpose flour, salt and pepper for coating.
Woodman’s original recipe had a simple approach. They dipped clams in milk and coated them in finely ground cornmeal and flour mix. The coated clams go into oil heated to about 360°F.
The clams need just 1½-2 minutes to turn golden brown. Nobody wants tough clams, so timing is vital to get that perfect texture – crispy outside and juicy inside.
Why Fried Clams Are a Classic
Fried clams became an instant hit after their first appearance at Essex’s Fourth of July parade in 1916. Their amazing taste led to the opening of countless “clam shacks” along New England’s coast.
This dish shows traditional New England food at its best. It takes local ingredients and turns them into something special through basic cooking methods. A century later, many places still stick to the original recipe: fresh clams, evaporated milk, corn flour and hot oil.
Fluffernutter Sandwich

Image Source: Yankee Magazine
The Fluffernutter sandwich stands out as New England’s sweet and sticky gift to comfort food. This simple combination of two ingredients has grown into a regional favorite that both kids and grown-ups can’t resist.
Fluffernutter Sandwich Ingredients
A genuine Fluffernutter needs just three basic items:
- White bread: Soft sandwich bread makes the perfect foundation. The classic version rarely includes whole grain options.
- Marshmallow Fluff: The original Durkee-Mower brand comes in its signature red, white and blue jar. The product stays pure with just four ingredients: corn syrup, sugar, dried egg whites, and vanillin—you won’t find any artificial preservatives.
- Peanut butter: The creamy variety works best (Teddie brand is a New England favorite). It blends perfectly with the marshmallow texture.
Fluffernutter Sandwich Preparation Method
Making this beloved sandwich couldn’t be easier:
Grab two slices of white bread and place them on your plate or cutting board. Spread 2-3 tablespoons of creamy peanut butter edge-to-edge on one slice. The exact amount doesn’t matter much, just make sure you use about the same amount of each spread.
Next, take 2-3 tablespoons of Marshmallow Fluff and spread it on your second slice. A generous scoop makes the spreading much easier.
Press both slices together with the peanut butter and marshmallow sides meeting in the middle. Most New Englanders love to cut their sandwiches diagonally before eating.
Why Fluffernutter Sandwich Is a Classic
The story begins in Melrose, Massachusetts back in 1913. Emma Curtis created what she called the “Liberty Sandwich” during World War I. She started by recommending brown bread with Snowflake Marshmallow Creme, a local treat she made with her brother.
The sandwich evolved through the decades. The name “Fluffernutter” caught on in the 1960s after Durkee-Mower hired a PR firm that created a catchy jingle about the recipe. The sandwich’s popularity grew so much that October 8th became National Fluffernutter Day.
This simple creation hits the perfect sweet-and-salty spot. Generation after generation of New Englanders hold it dear as a childhood favorite and comfort food that keeps getting better with time.
Surf and turf restaurants with an ocean view.
Indian Pudding

Image Source: Simply Recipes
Native cornmeal replaced scarce wheat flour when New England settlers adapted British hasty pudding during colonial times. The dessert made its first appearance in American cookbooks in the late 1700s and stands as a symbol of traditional New England food heritage.
Indian Pudding Ingredients
The classic recipe needs just a handful of simple items:
- 4 cups whole milk
- 1/2 cup yellow cornmeal
- 1/2 cup molasses
- 1/4 cup maple syrup
- 2 tablespoons unsalted butter
- 2 eggs (beaten)
- Salt and spices (cinnamon, ginger, nutmeg)
Each ingredient tells a story of cultural fusion. Settlers called cornmeal “Indian meal,” which came from Native Americans. Boston’s rum trade brought an abundance of molasses during the 17th and 18th centuries.
Indian Pudding Preparation Method
The process starts with milk simmering in a double boiler. A gentle stream of cornmeal goes into the milk and cooks for about 15 minutes until thick. The next step blends in molasses, maple syrup, butter, eggs and spices.
The mixture goes into a greased baking dish for a two-hour bake at 300°F. People once baked the pudding overnight in cooling wood-fired ovens. This long, slow cooking creates rich flavors as milk, cornmeal and molasses blend together.
Why Indian Pudding Is a Classic
A warm serving with vanilla ice cream makes this dessert a seasonal favorite. The pudding’s looks might not impress – it resembles a “coarse, lumpy custard tinted brown”. Yet its comfort food status earned it a permanent spot among classic New England recipes.
The pudding’s popularity has ebbed and flowed through history. America’s Colonial Revival movement brought it back to dining tables in the early 20th century. Today, New England families call it a holiday essential that bridges Native American and European cooking traditions.
Johnnycakes

Image Source: YouTube
Indigenous populations passed down johnnycakes to early settlers, and these simple cornmeal flatbreads represent how native ingredients shaped traditional New England food. The dish earned various names like journey cake, hoecake and Shawnee cake, creating a lasting culinary connection to America’s earliest food traditions.
Johnnycakes Ingredients
A traditional johnnycake recipe needs just a few basic items:
- Cornmeal (Rhode Island traditionally uses white flint corn)
- Salt
- Hot water or milk
- Fat for cooking (historically bacon drippings)
Rhode Island’s johnnycake variations come in two styles: thick or thin. South County’s thick-style johnnycakes combine cornmeal with sugar, salt and boiling water, with milk added to achieve the right consistency. The thin johnnycakes skip boiling water, which creates a more pancake-like texture.
Modern recipes have added eggs, flour, baking powder and buttermilk to reshape the scene between cornbread and pancakes.
Johnnycakes Preparation Method
The authentic johnnycake preparation starts when you mix cornmeal and salt. The thick-style recipe needs boiling water poured slowly over the mixture – just enough to make the meal swell. The batter should rest before adding milk until it reaches dropping consistency.
Early cooks would place thick corn dough on wooden boards near an open fire. Today’s recipes suggest using a well-greased hot griddle or cast iron skillet. The johnnycakes need about 5-6 minutes per side until their edges turn brown, creating a crisp exterior and slightly chewy center.
Why Johnnycakes Are a Classic
Johnnycakes managed to keep their place in New England cuisine because they’re practical and versatile. These indigenous flatbreads became vital to colonial diets and showed how cultures mixed and adapted.
Rhode Island’s residents turned johnnycakes into their signature regional dish, sparking heated discussions about the right way to make them. Rhode Island’s first documented jonnycake recipes from the 1930s showed that careful cooking with enough fat creates the crispy exterior that makes this classic New England recipe special.
Lobster Roll
Image Source: Maine Lobster Marketing Collaborative
The lobster roll started as a simple fisherman’s lunch and has now become an iconic symbol of traditional New England food culture. This elegant sandwich shows off the region’s best seafood simply and naturally. Visitors to New England’s coastal communities consider it a must-try culinary experience.
Lobster Roll Ingredients
A genuine lobster roll needs just a few key components:
- Lobster meat – traditionally claw, knuckle and body meat (not tail)
- Split-top hot dog buns – New England-style with flat sides for toasting
- Butter for toasting buns and (in Connecticut-style) warming lobster
- Mayonnaise (for Maine-style) – used much of either at about ¼ cup per pound
- Lemon juice and zest – adds brightness without excess moisture
- Celery – finely diced for subtle crunch
- Chives – for mild onion flavor
- Salt and pepper
Most purists debate whether celery belongs in the mix. They agree that mayo should be light to let the lobster’s delicate flavor shine through.
Lobster Roll Preparation Method
Time has given rise to two distinct styles:
The Maine style features cold lobster meat mixed with light mayonnaise dressing, celery and subtle seasonings. This mixture nestles into a buttered, toasted split-top bun.
The Connecticut style takes a different approach with warm buttered lobster meat without mayo, served in the same toasted bun style.
Both versions start by warming the lobster gently in butter for 2-3 minutes before adding the dressing. The split-top bun needs careful attention – butter both flat sides and toast until golden brown. This step takes about five minutes to reach the perfect crispness.
Why Lobster Roll Is a Classic
Perry’s restaurant in Milford, Connecticut first put lobster rolls on their menu around 1927. The sandwich spread faster throughout New England’s coastal establishments. This regional specialty stayed close to home until the 1960s before gaining national recognition.
The lobster roll represents New England cuisine’s essence perfectly. It showcases exceptional local ingredients with minimal fuss and creates an exceptional taste experience from basic components.
Maple Syrup Candy
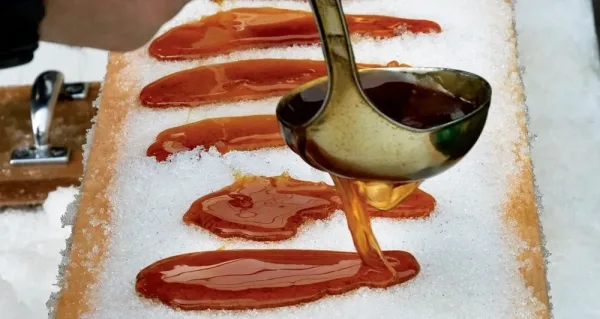
Image Source: Yankee Magazine
Pure maple syrup becomes a delightful treat when heated and cooled with care. This classic New England sweet treat draws visitors who love to take it home as souvenirs. The candy stays pure with just one ingredient, unlike today’s modern candies.
Maple Syrup Candy Ingredients
The authentic maple candy recipe stays simple:
- 100% pure maple syrup (Grade A Light Amber or Medium Amber works best)
- A few drops of butter or vegetable oil (optional to help reduce foam)
Temperature control creates the magic without extra ingredients. A quart of maple syrup yields about 2 pounds of finished candy. Golden Delicate sweet syrup gives the best flavor for candy making.
Maple Syrup Candy Preparation Method
Making perfect candy takes precision and attention to detail.
The syrup needs heating in a deep pot to exactly 32°F above water’s boiling point. This temperature reaches 240-244°F for soft maple candies and up to 300°F for hard “maple stained glass” versions. A deep pot helps manage the considerable foaming that happens.
The mixture should cool without disturbance to 175-185°F. Then stir it until it loses its shine and starts to look opaque. The candy must go into prepared molds at this exact moment – not before, not after.
The candies need several hours on a drying rack to harden completely and get the perfect texture.
Why Maple Syrup Candy Is a Classic
Maple leaf shapes remain the most iconic design for these candies. Many producers create pilgrim figures, seasonal shapes and New England symbols like moose and lobsters too.
This traditional New England food shows the region’s heritage and natural abundance. People love these treats most in winter during maple syrup harvest season throughout the northeastern United States.
The candy proves how simple, natural ingredients turn into amazing treats that families have enjoyed for generations. It showcases New England’s unique culinary heritage.
New Haven Pizza

Image Source: Just Like Dad’s Pizza
Locals lovingly call it “apizza” (pronounced “ah-beetz”). New Haven pizza has earned a reputation that stands up to both Chicago and New York styles among serious pizza lovers. This traditional New England food got its start when Italian immigrant bakers made their way to New Haven in the late 1800s and early 1900s.
New Haven Pizza Ingredients
A genuine New Haven-style pizza needs these specific ingredients:
- Simple dough made from bread-like coarser ground flour (unlike fine Neapolitan 00 flour)
- Dough that sits cold for at least 24 hours to develop rich flavor
- Crushed Italian tomatoes as the base sauce
- Grated pecorino Romano cheese and olive oil
- Little to no mozzarella (“mootz”) on traditional versions
- Optional toppings like their famous white clam pizza with fresh shucked local clams, garlic, oregano and olive oil
The “plain” New Haven pizza comes without mozzarella unless you ask for it – something that sets it apart from most American pizzas.
New Haven Pizza Preparation Method
Making real New Haven pizza takes special care and technique.
The dough needs to rest cold for 24-48 hours. This helps develop the gluten and complex flavors. Once it reaches room temperature, pizza makers stretch the dough by hand instead of tossing it. This creates pizzas with unique shapes and less defined edges.
The cooking method is not like Neapolitan style at all. Instead of quick cooking at 800-1000°F, these pizzas bake longer (5-12 minutes) at lower temperatures (600-650°F). This slower baking creates that signature even browning and char that pizza experts love.
Why New Haven Pizza Is a Classic
New Haven-style pizza has made a name for itself beyond Connecticut. The crust stays thin yet strong with less “flop” than Neapolitan styles. You get that perfect mix of crispy outside and chewy inside.
This classic New England recipe started in 1898 when Luigi Pannone brought pizza to New Haven. Today, you’ll find the most famous spots on Wooster Street, especially Sally’s and Frank Pepe’s, which have grown into national chains.
The style keeps growing in popularity. About 80 restaurants outside Connecticut now serve New Haven-style pizza, making it an important part of New England cuisine.
Laugh at these Connecticut puns.
Red Flannel Hash

Image Source: Simply Recipes
Ruby-red beets give Red Flannel Hash its vibrant color. This hearty breakfast dish celebrates traditional New England food history by turning leftovers into something special. The dish gets its playful name from looking like red flannel plaid patterns, thanks to the colorful mix of red beets, pink potatoes and corned beef.
Red Flannel Hash Ingredients
A genuine Red Flannel Hash needs these key ingredients:
- 2 cups cooked, diced corned beef
- 1½-2 cups cooked, diced beets
- 1½-2 cups boiled, diced potatoes
- 1 cup chopped onion
- 2-3 tablespoons butter
- Optional additions: Worcestershire sauce, fresh parsley, heavy cream
- Salt and pepper to taste
The dish emerged as a clever way to use leftovers from a New England Boiled Dinner. Unlike regular corned beef hash, beets make this version special. Their juice slowly turns everything into beautiful shades of pink.
Red Flannel Hash Preparation Method
The authentic recipe starts with butter melting in a cast-iron skillet over medium-high heat. Add onions and cook them until they turn translucent, about 5 minutes. Next, mix in the corned beef, potatoes and beets.
Press the mixture down firmly with a metal spatula and let it cook until one side browns nicely. Most chefs suggest minimal stirring to help form a crispy crust. After browning, flip sections to cook the other side.
Some New England cooks prefer baking the mixture at 350°F for about 40 minutes instead of using the stovetop. This method creates an evenly browned dish.
Why Red Flannel Hash Is a Classic
Red Flannel Hash showcases classic New England cuisine by turning yesterday’s meal into today’s delicious breakfast. The colonists created this dish that reflects their resourcefulness and regional taste.
The blend of earthy beets, savory corned beef and starchy potatoes creates a perfect balance. You’ll still find this dish on breakfast tables across New England, especially during cold winter mornings that call for a warming meal.
Steamed Clams

Image Source: Chef Dennis
Steamed clams stand out among New England’s seafood treasures. They create an interactive dining experience that celebrates simplicity and coastal tradition. These soft-shell clams—called “steamers” or “piss clams” by locals because they squirt water—are the life-blood of traditional New England food.
Steamed Clams Ingredients
This classic New England recipe shines through its simple approach:
- Live soft-shell clams (typically 6-12 dozen to serve 4 people)
- Water or beer (locals say beer makes clams tender and sweet)
- Salt (when using water instead of seawater)
- Melted butter to dip
- Optional additions: lemon juice, garlic, white wine, herbs
Essex’s clammers believe soft-shell clams from muddy areas taste substantially sweeter than those from sandy bottoms.
Steamed Clams Preparation Method
Clean the clams properly before cooking. Soak them in cold saltwater with a tablespoon of cornmeal or flour for 30-60 minutes. This helps remove sand and grit. Local cooks add hot peppers or black pepper to speed up the cleaning.
Put the clams in a large pot with about one cup of boiling water or beer—just enough to cover the bottom. Steam them covered over low heat until shells open wide, usually 5-10 minutes. Throw away any clams that stay closed after cooking.
Why Steamed Clams Are a Classic
A steamer feast captures New England cuisine’s authentic spirit. Each diner follows a special ritual—pulling the clam by its neck, removing the dark skin, rinsing it in broth to clean off sand, then dipping in melted butter. This creates lasting memories.
Summer gatherings “downeaster at a cottage” or “uptah camp” wouldn’t be complete without steamed clams. They make an affordable yet delicious meal that connects people to the region’s seafaring heritage. People love them both for their taste and the fun, hands-on eating experience they create.
Tourtière (Meat Pie)

Image Source: Allrecipes
The savory aroma of Tourtière fills kitchens throughout New England’s Franco-American communities when winter holidays roll around. This hearty French-Canadian meat pie made its way south with Quebec immigrants and has become a beloved part of traditional New England food culture, especially during Christmas and New Year celebrations.
Tourtière Ingredients
A classic Tourtière brings together these simple yet distinctive ingredients:
- Ground meats (most recipes stick to pork, though many families use a mix of pork, beef, and veal)
- Spices (you’ll need cinnamon, cloves, allspice, nutmeg, and savory)
- Potatoes (mashed ones help bind everything together)
- Onions and garlic, finely minced
- Traditional pie pastry that uses lard or butter
Each region puts its own spin on the recipe. Some families throw in celery or swap traditional spices for Bell’s Seasoning. Many families even keep several versions of their recipe, including some interesting takes with cheddar cheese or gravies.
Tourtière Preparation Method
The magic starts when you slowly cook ground meat with onions and spices. Add enough water to break down the meat – this can take anywhere from 30 minutes to 3-4 hours, depending on your family’s tradition. This long cooking time helped our ancestors avoid trichinosis.
The next step comes after the meat cooks and liquid evaporates. Mix in mashed potatoes to bind everything together. Let the filling cool down, then place it in a pie shell. Top it with a second crust, seal the edges, and bake until it turns golden brown (usually 45-60 minutes at 375-400°F).
Why Tourtière Is a Classic
Tourtière shows how immigrant traditions have become part of New England cuisine. When Franco-Americans brought this dish to mill towns and “Little Canadas” across the region, it quickly became a holiday gathering staple.
This pie’s beauty lies in its adaptability. Each family adds their own touch to the recipe, yet you’ll always recognize it as Tourtière. This flexibility will give it staying power as a classic New England recipe that families pass down through generations. Making Tourtière each year helps many families stay connected to their roots while they create new memories around this shared food tradition.
Yankee Pot Roast

Image Source: Yankee Magazine
The life-blood of hearty New England cuisine, Yankee Pot Roast turns tough cuts of beef into fork-tender perfection with slow, patient braising. This one-pot meal has stayed on family dinner tables for generations and embodies the region’s practical cooking philosophy.
Yankee Pot Roast Ingredients
This traditional New England food needs:
- 2-3 pound beef chuck roast (some chefs like brisket better for flavor)
- Flour for dredging
- Aromatic vegetables: onions, carrots, celery, garlic
- Fresh herbs: rosemary, thyme sprigs, bay leaves
- Red wine (about 1 cup) and beef stock (3-4 cups)
- Salt pork or bacon (in some regional variations)
- Seasonings: salt, pepper, occasionally allspice berries
Many recipes add tomato paste to give more depth and richness to the gravy. The Yankee version stands out by cooking root vegetables with the meat.
Yankee Pot Roast Preparation Method
Start by drying and seasoning the beef, then dredge it in flour before searing in hot oil until deeply browned on all sides—about 5-7 minutes per side. The aromatics cook in the same pot to scrape up the flavorful browned bits.
Red wine deglazes the pot, followed by beef stock and herbs. The meat goes back in, and everything cooks in a 325°F oven for 2-3 hours. The roast needs a gentle simmer, not a boil, to reach its signature tenderness.
Root vegetables join the pot during the last 20-30 minutes of cooking. Let the roast rest while you strain and thicken the cooking liquid into gravy.
Why Yankee Pot Roast Is a Classic
This dish shows what makes classic New England recipes special – patience leads to amazing results. The long cooking process creates something extraordinary from both tough meat and simple vegetables.
Yankee Pot Roast shows the region’s thrifty nature by creating something special from basic ingredients. Families have adapted the recipe based on what’s in season and created countless versions while keeping its true character.
Comparison Table
| Dish Name | Main Ingredients | Preparation Method | Historical/Cultural Significance | Serving Suggestions |
|---|---|---|---|---|
| American Chop Suey | Elbow macaroni, ground beef, onions, green peppers, tomato sauce | Brown the meat, cook vegetables, mix with cooked pasta and sauce | Started in the early 1900s and evolved from Chinese versions around 1908 | Popular in school cafeterias and community potlucks |
| Anadama Bread | Cornmeal, molasses, flour, yeast, butter | Start with cornmeal porridge, mix remaining ingredients, knead and let rise twice, then bake | Became a trademarked bread brand in 1850, shows colonial adaptation | Makes great sandwich bread or toast, tastes amazing with peanut butter and jelly |
| Apple Cider Doughnuts | Reduced apple cider, flour, spices, buttermilk | Boil down the cider, mix spiced batter, let it chill, shape and fry | Became a hit in the 1950s | Best enjoyed at orchards during fall, rolled in cinnamon sugar |
| Baked Beans | Navy beans, salt pork, molasses, brown sugar, mustard | Let beans soak overnight, add pork layers, season well, bake slowly for 6 hours | A Saturday night tradition since colonial times | Best paired with brown bread |
| Boiled Lobster | Live lobsters, salt water | Boil in salted water until shells turn bright red (7-14 minutes based on size) | Classic coastal recipe | Pairs perfectly with melted butter and lemon wedges |
| Boston Cream Pie | Sponge cake, vanilla custard, chocolate glaze | Build cake layers with custard filling and top with chocolate | Born at Parker House Hotel in 1856, became Massachusetts’ state dessert in 1996 | Perfect dessert choice |
| Clam Chowder | Clams, salt pork/bacon, potatoes, cream, onions | Start with pork, add vegetables, mix in potatoes and clams, finish with cream | A beloved coastal dish that sparked rivalry with Manhattan style | Best with oyster crackers |
| Fluffernutter Sandwich | White bread, peanut butter, Marshmallow Fluff | Layer peanut butter on one slice, add Fluff on another, press together | Created in Melrose, MA in 1913, got its name in the 1960s | Tastes better cut diagonally |
| Indian Pudding | Cornmeal, molasses, milk, maple syrup, spices | Mix cornmeal with milk, blend in other ingredients, bake slowly for 2 hours | A colonial twist on British hasty pudding | Tastes best warm with vanilla ice cream |
| Johnnycakes | White flint cornmeal, salt, water/milk | Combine ingredients, cook until crispy on a hot griddle | Native American recipe adapted by early settlers | Great for breakfast or as a side |
| Lobster Roll | Fresh lobster meat, split-top bun, mayo or butter | Mix with mayo (Maine style) or warm in butter (Connecticut style), serve in toasted bun | First appeared around 1927 in Connecticut | Enjoy cold (Maine) or warm (Connecticut) |
| New Haven Pizza | Coarse flour, tomatoes, pecorino Romano, olive oil | Let dough cold-ferment, bake at 600-650°F for 5-12 minutes | Started with Italian immigrants in the late 1800s | Comes without mozzarella unless requested |
| Red Flannel Hash | Corned beef, beets, potatoes, onions | Mix ingredients, crisp them up in a cast iron skillet | Creative way to use leftover New England Boiled Dinner | Makes a hearty breakfast |
| Steamed Clams | Live soft-shell clams, water/beer, butter | Wash clams well, steam until shells open (5-10 minutes) | Traditional seaside favorite | Dip in broth and melted butter |
| Tourtière | Ground meats, spices, potatoes, pie crust | Cook meat mixture, blend with mashed potatoes, bake in pie shell | French-Canadian holiday classic | Highlight of Christmas and New Year feasts |
| Yankee Pot Roast | Chuck roast, root vegetables, aromatics, wine | Brown the meat, slow cook with vegetables 2-3 hours | Shows New England’s love for patient, thrifty cooking | Complete meal in one pot |
Enjoy New England Cuisine
These 23 classic recipes capture the true spirit of New England cuisine. The region’s cooking style has been shaped by seafood, cornmeal, molasses and maple syrup for centuries. Every dish, from crispy Johnnycakes to creamy Clam Chowder, tells a unique story of cultural exchange and creativity that honors its roots while continuing to evolve.
The remarkable staying power of these dishes sets them apart. Food trends may come and go, but these traditional recipes remain staples on New England’s tables. Families pass them down through generations with just small tweaks here and there. The region’s practical cooking approach turns simple, local ingredients into unforgettable meals, which explains why these recipes have stood the test of time.
New England’s rich history shines through its unique culinary identity. Native American influences show up in cornmeal-based dishes like Anadama Bread and Johnnycakes. French-Canadian immigrants brought their savory Tourtière to the mix. Italian bakers altered the map of Connecticut’s food scene with their New Haven-style pizza. The coastal communities found countless ways to showcase their abundant seafood, creating everything from simple Steamed Clams to iconic Lobster Rolls.
These dishes charm people not just with their flavors but with their deep cultural roots. Boston Baked Beans started as a practical Sabbath meal solution. Apple Cider Doughnuts now bring to mind autumn harvest celebrations. Modern diners connect with centuries of regional traditions through these foods.
People enjoy these classic recipes at home and in local restaurants, finding more than just nourishment on their plates. They discover a direct link to New England’s heritage that still feels relevant today. Modern kitchens might update the cooking methods occasionally, but the essence remains unchanged. The distinctive ingredients, balanced flavors, and cultural significance continue to represent New England’s authentic taste.
FAQs
Q1. What are some iconic ingredients in New England cuisine?
New England cuisine is known for its use of seafood, cornmeal, molasses and maple syrup. These ingredients feature prominently in many traditional dishes, reflecting the region’s coastal location and agricultural history.
Q2. How has New England cuisine been influenced by different cultures?
New England cuisine has been shaped by various cultural influences, including Native American, French-Canadian and Italian. For example, cornmeal-based dishes like Johnnycakes have Native American roots, while Tourtière is a French-Canadian contribution and New Haven-style pizza was introduced by Italian immigrants.
Q3. What is the significance of seafood in New England cooking?
Seafood plays a crucial role in New England cuisine due to the region’s extensive coastline. Many classic dishes showcase local seafood, such as clam chowder, lobster rolls and steamed clams, reflecting the importance of fishing to the area’s economy and culture.
Q4. Are there any unique cooking methods associated with New England cuisine?
Yes, New England cuisine often employs slow cooking methods, such as the long baking time for Boston baked beans or the slow braising of Yankee pot roast. These techniques often transform simple, inexpensive ingredients into flavorful, hearty meals.
Q5. How have New England recipes evolved over time?
While many New England recipes have remained relatively unchanged for generations, some have adapted to modern tastes and cooking methods. However, the core ingredients and flavors typically remain true to their origins, maintaining the dishes’ cultural significance and regional identity.


Leave A Comment