

Nature’s most spectacular wildlife show unfolds across Africa as over 1.2 million wildebeest and 300,000 zebras begin an epic experience. These massive herds pack so densely – up to 1,000 animals per square kilometer – that satellites can spot them from space.
The spectacle runs year-round, spanning 1,200 miles between Tanzania and Kenya. This circular trek offers photographers countless magical moments. Dramatic river crossings dominate from July through September. The spectacular calving season peaks in February when up to 8,000 wildebeest calves are born each day.
This detailed guide pinpoints the perfect timing to capture each phase of this remarkable display. Photographers can now plan their shoots effectively and document nature’s greatest show on Earth.
Best Times to Photograph Different Migration Events
Wildlife photographers need perfect timing to capture the most dramatic moments of the great migration.
Capturing River Crossings (July-October)
The most spectacular river crossings happen between mid-July and October. August and September give you the best chances to witness these incredible events. Wildebeest herds traverse both the Mara and Talek rivers during this time, which creates amazing photo opportunities.
Wildebeest gather by hundreds, sometimes thousands, at crossing points. They might wait for hours or days before taking the plunge. The best shots come from positioning yourself on the bank where animals cross toward your camera. This lets you capture dramatic action shots of their descent.
Photographing Calving Season (January-March)
The southern Serengeti plains become a wildlife photographer’s paradise during calving season. Over 500,000 wildebeest calves arrive within a two to three-week window in February. Peak calving periods bring up to 8,000 newborns each day.
Mother wildebeest choose the shorter grass plains of the southern Serengeti. These areas help them spot predators more easily. The region’s volcanic soil produces rich grass that keeps animals fed. This creates perfect conditions to capture both tender nurturing moments and intense predator encounters.
Documenting Predator Action Scenes (Year-round)
Your best chances to capture predator action come early morning, before sunrise and the first hour after. Professional photographers suggest keeping your camera ready for action throughout game drives. A minimum shutter speed of 1/1000 second works best.
Great predator photos need these camera settings:
- Use high-speed continuous drive mode
- Keep higher ISO settings in low light
- Leave room for movement in action shots
Calving season draws many predators who time their own breeding to match the abundance of vulnerable prey. This natural timing gives you amazing chances to capture both hunting sequences and predator cubs as they learn survival skills.
When is the best time to visit Kenya for a safari?
Essential Camera Settings for Migration Photography

Becoming skilled at camera settings is a vital part of capturing the intense action of Africa’s great migration.
Shutter Speed Requirements for Moving Herds
Shutter speed determines how sharp your wildlife images will be. You just need at least 1/1000-1/2000 second to freeze fast-moving herds. Different scenarios need specific speeds:
- Stationary animals: 1/100-1/400 second for sharp images
- Walking herds: 1/500-1/1000 second
- Running/fighting scenes: 1/1000-1/2000 second
Optimal Aperture Settings for Different Scenes
Your choice of aperture affects both depth of field and available light. Wider apertures between f/2.8 and f/5.6 work best for migration photography. This range gives you two advantages:
Wider apertures create smooth backgrounds that isolate subjects from busy moving herds. They also let more light reach your camera’s sensor, giving you flexibility with shutter speeds. You should adjust your aperture based on the scene – f/2.8-f/4 works great for individual animals, while f/5.6-f/8 is better for group shots.
ISO Recommendations for Various Light Conditions
Finding the right ISO means balancing light sensitivity and image quality. You can keep ISO between 100-500 in bright daylight for the best image quality. In spite of that, migration activity peaks at dawn and dusk, so you’ll need to adjust your ISO.
Modern cameras can handle ISO 800-3200 in low light conditions. Many professional wildlife photographers use Auto ISO with these settings:
- Maximum ISO cap: 800-1600 for action shots
- Minimum shutter speed: 1/1000 second
- Base ISO: Lowest native setting available
These basic settings create a strong foundation to capture dramatic migration moments. Fast shutter speeds should be your priority over lower ISO settings. You can reduce noise in post-processing, but motion blur is impossible to fix.
Prime Photography Locations Throughout the Year
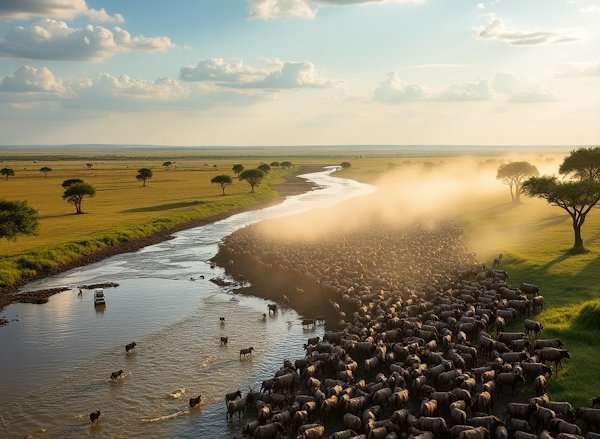
Choosing the right spot makes all the difference between capturing ordinary migration photos and extraordinary ones. Tanzania’s landscapes are so big that certain locations provide unmatched views of this remarkable trip.
Northern Serengeti River Crossing Viewpoints
The northern Serengeti has prime photography spots along the Mara River between July and October. Photographers can get dramatic river crossing shots at the Purungat, Peninsula and Fig Tree crossing points. The western bank of the Mara River, especially in the Mara Triangle, gives the best angles when animals move westward.
Look-out crossing points feature dramatic channels that reach up to six meters high and have enough space for multiple vehicles. The southern region sees the most back-and-forth crossings, which creates perfect opportunities for action shots.
Southern Plains Calving Ground Positions
The southern Serengeti plains near the Ndutu area and Ngorongoro Conservation Area become nature’s largest nursery from January to March. Massive herds gather here because the phosphorous-rich soils create nutritious grazing grounds.
The short-grass plains near Lake Ndutu and areas next to Maswa Game Reserve give photographers clear views of calving events and predator action. Cheetahs hunt on these wide-open plains while lion prides patrol the marsh and woodland areas near Lake Ndutu.
Western Corridor Action Spots
The Western Corridor, with its Grumeti River, is a vital photography destination from late May to mid-July. Near the Grumeti Tented Lodge, photographers can watch approximately 25,000 wildebeest cross daily during peak migration.
Key photography platforms include:
- Kirawira’s elevated platforms give unobstructed views of animal behavior
- Ndakasi Mobile Camp’s strategic positions follow migrating herds
- Lake Victoria View Camp blends savannah and water wildlife scenes
The corridor acts as a wet/dry transition zone where about 50,000 wildebeest live permanently, which ensures year-round photography opportunities. These resident herds and large numbers of other species create constant chances to capture predator-prey interactions throughout the seasons.
Mastering Light Conditions Across Seasons
Light conditions define migration photography. They can turn simple scenes into spectacular captures in Tanzania’s varied landscapes.
Working with Harsh Midday Light
Wildebeest tend to cross rivers during the hottest times, which creates unique photography challenges. Photographers face problems with strong shadows and overexposed areas. You can handle these conditions better by:
- Using polarizing filters to cut glare and improve color saturation
- Placing the sun at 10 or 2 o’clock relative to the camera
- Taking shots in shaded areas near water sources
Note that early morning or late afternoon gives you better conditions for wildlife shots. The harsh midday sun requires exposure compensation to manage bright water splashes and reflections.
Golden Hour Opportunities
Africa’s sunrise creates magical conditions unlike anywhere else. The golden hours right after sunrise and before sunset bathe everything in warm, soft light that makes images look better.
These precious moments let photographers capture intimate shots of individual animals or small groups. Animals are more active during cooler hours, which creates perfect conditions to capture detailed portraits and behavior.
Light quality makes all the difference in wildlife photography. The morning hours between 6 AM and 9 AM provide soft, warm light. This is perfect because animals are most active then. These conditions create dramatic shadows that add depth to your images.
Dealing with Dust and Haze
Dust becomes a big challenge, especially during dry season. Your equipment needs protection, so you should:
- Keep all gear in tight cases
- Use tent bags as backup protection
- Keep extra lens caps handy
- Have large microfiber cloths ready
Fog, mist, pollution, or dust can create haze that blocks your subject and makes images less clear. You can curb these effects by adjusting your white balance to match the light. Setting it to ‘Cloudy’ or ‘Shade’ helps warm up images and fixes the cool tones that come with haze.
The best way to minimize atmospheric effects is to shoot near sunrise. This helps you avoid the heat haze that peaks during the hottest parts of the day. You can create backlit scenes by putting your subject between the camera and light source. This adds a natural glow around your subject and makes the hazy atmosphere work for you.
Photography Equipment Guide by Season
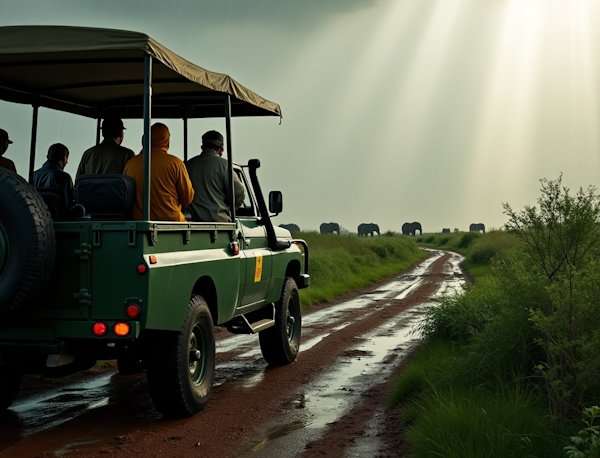
Photography equipment selection and protection are the foundations of documenting Africa’s great migration through changing seasons.
Wet Season Gear Protection
Your camera equipment needs reliable rain protection. Professional photographers use specialized rain covers that give quick access to camera controls while keeping gear dry. A reliable rain cover should have:
- A clear plastic panel to see the LCD screen
- Elastic drawcords that work with tripods
- Hook-and-loop straps to attach lenses
- Hot shoe attachments for secure positioning
Photographers should pack multiple rain covers since sudden storms can appear quickly. Between shoots, storing cameras in dry bags helps prevent moisture damage.
Dry Season Lens Selection
The dry season brings dust as a major challenge that makes lens changes risky. A versatile zoom lens setup reduces the need to switch lenses often. The best coverage comes from:
A medium telephoto zoom (70-200mm) for close action shots and a super-telephoto (100-500mm) for distant subjects. These lenses must have weather sealing to handle harsh conditions.
Fast-aperture lenses are a great way to get shots in low light. The f/2.8 or f/4 options work best during dawn and dusk migration activities. Photographers should keep a rocket blower and cleaning supplies handy to remove dust.
Essential Backup Equipment
Remote locations and challenging conditions make equipment backup a vital part of the journey. A complete backup strategy has:
- Multiple camera bodies to avoid lens changes
- Extra batteries (minimum two per camera)
- High-capacity memory cards with fast write speeds
- Portable power strip to charge multiple devices
- External hard drives for daily backups
Each camera’s power needs vary during long shooting sessions. Some models like the Canon R3 can shoot all day on one charge, while others need battery changes every few hours.
Most lodges have limited charging options with just one or two outlets available. A travel power strip that has built-in USB ports lets you charge multiple devices at once.
Enjoy the Great Migration Africa
Taking photos of Africa’s great migration needs perfect timing, technical skills and good preparation. The dramatic river crossings between July and October give you spectacular photo opportunities. Each season offers unique chances to capture nature’s greatest show. You’ll get exceptional results by becoming skilled at essential camera settings, especially when you have to balance shutter speed and ISO.
Your choice of location matters just as much as timing. The right spot along the Mara River crossings, southern plains during calving season or western corridor action spots makes all the difference between basic snapshots and stunning wildlife photographs. Of course, knowing how light changes across seasons will boost your image quality, whether you’re dealing with harsh midday sun or golden hour shots.
Protecting your gear is crucial throughout the trip. You need to adjust your equipment choices and protection based on what each season throws at you. The wet season needs good rain covers, while the dry season calls for careful lens picks and thorough cleaning routines. A backup camera will give you non-stop shooting during this amazing wildlife spectacle.
FAQs
Q1. When is the best time to photograph the Great Migration?
The best time to photograph the Great Migration varies depending on what you want to capture. River crossings are most dramatic between July and October, with August and September offering the highest chances. For calving season, visit the southern Serengeti plains from January to March. Year-round opportunities exist for predator action scenes, especially during early mornings.
Q2. What camera settings should I use for migration photography?
For moving herds, use a shutter speed of at least 1/1000-1/2000 second. Aperture settings between f/2.8 and f/5.6 are most effective. In bright daylight, keep ISO between 100-500, but be prepared to increase it to 800-3200 in low-light conditions. Prioritize faster shutter speeds over lower ISO to capture sharp images of fast-moving animals.
Q3. Where are the best locations to photograph different migration events?
For river crossings, focus on the northern Serengeti’s Mara River between July and October. The southern Serengeti plains near Lake Ndutu are ideal for calving season from January to March. The Western Corridor, particularly around the Grumeti River, offers great opportunities from late May to mid-July. Each location provides unique perspectives on different aspects of the migration.
Q4. How can I deal with challenging light conditions during the migration?
During harsh midday light, use polarizing filters and position the sun at 10 or 2 o’clock relative to your camera. Take advantage of the golden hours just after sunrise and before sunset for warm, soft light. In dusty or hazy conditions, adjust your white balance and consider shooting backlit scenes to enhance the atmosphere.
Q5. What essential equipment should I bring for migration photography?
Bring weather-sealed cameras and lenses, including a medium telephoto zoom (70-200mm) and a super-telephoto (100-500mm). Pack rain covers for wet season protection and cleaning supplies for dust management in the dry season. Always carry extra batteries, high-capacity memory cards and external hard drives for backups. Consider bringing a portable power strip for efficient charging in remote locations.


Leave A Comment