
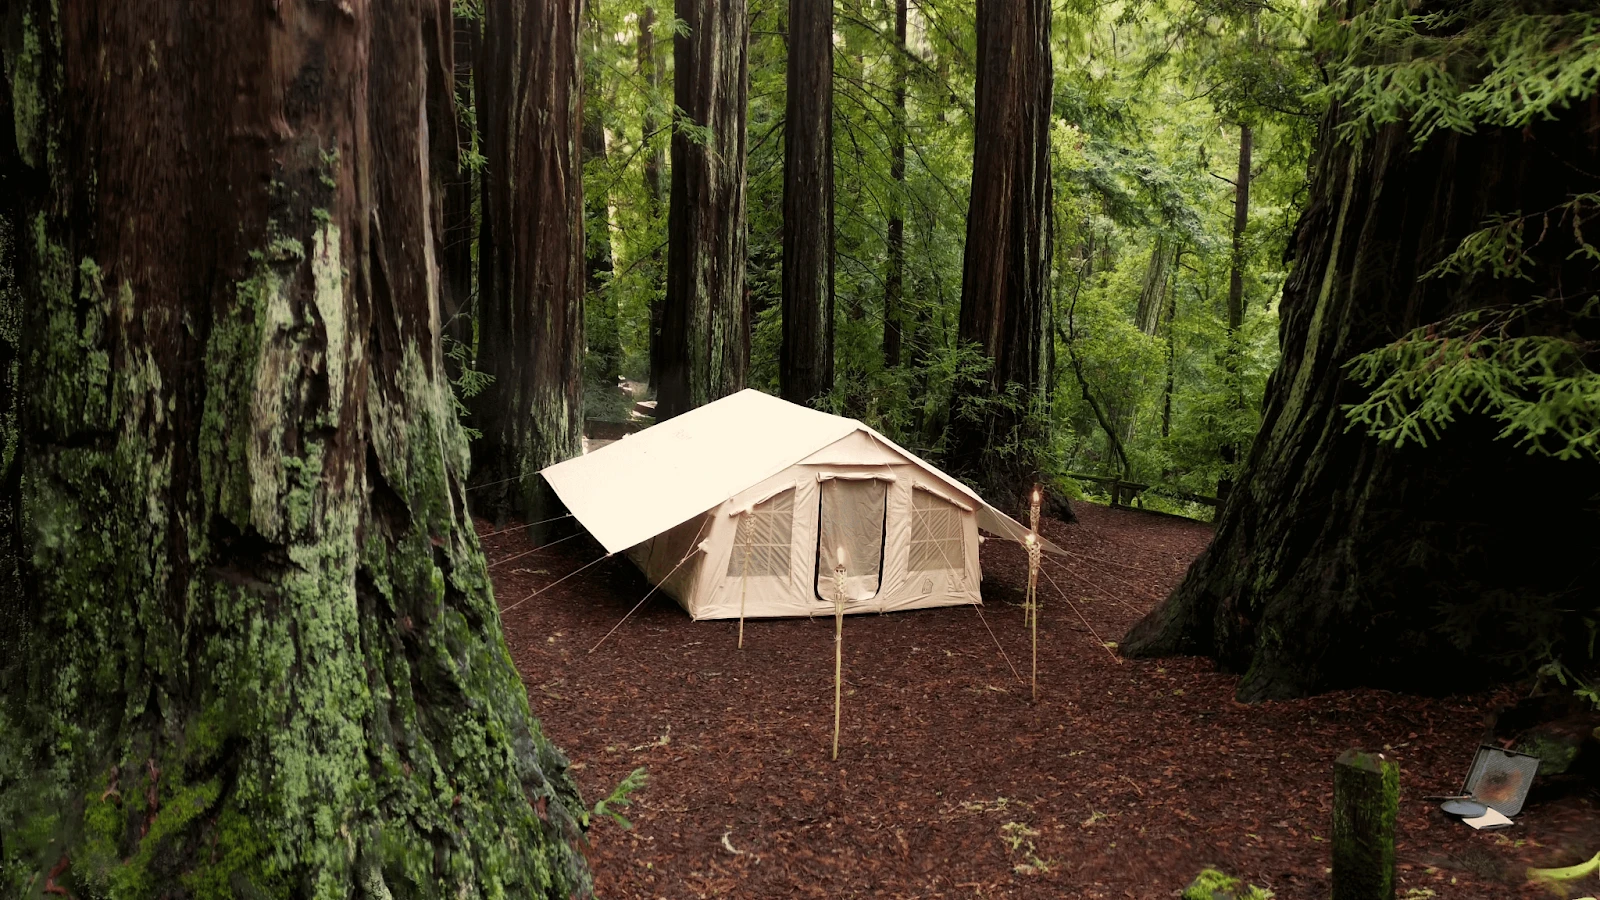
Inflatable tents are built around air beams instead of rigid poles: TPU bladders inside a durable polyester shell form a stable frame that goes up fast, spreads wind loads evenly, and handles wet weather when pitched and anchored correctly. For most campers, the appeal is simple—quick setup, real weather resistance, and compact portability without giving up interior volume.
If you like to scan references before diving deep, these resources help you compare early in the read: the full lineup with current specs and Coody inflatable tent price, a larger-format option in the Coody 17.2 inflatable tent, and a dome layout many families start with under inflatable tents for camping. In the sections ahead, we’ll unpack how an inflatable tent works, how it differs from traditional tents, the main types on the market, and the buying tips that matter for a practical, long-lasting setup.
What is an inflatable tent and why campers love it
At its core, an inflatable tent replaces rigid poles with air beams instead—sealed TPU bladders that form the frame when you pump them up. The fabric shell (typically polyester or a technical cotton blend) stretches over those beams, creating a structure that spreads wind loads across curved surfaces and keeps the interior stable when weather turns. Because the frame is continuous rather than segmented, setup is straightforward: connect the pump, inflate to the recommended pressure, stake corners, and add guylines.
Core components, briefly:
- Air beams (TPU bladders). Flexible, impact-tolerant chambers that act like poles once inflated.
- Outer canopy. Durable, waterproof fabric with taped seams; many models add storm flaps and reinforced stress points.
- Valves and manifold. One or multiple valves; some systems let you inflate the whole frame from a single point.
- Ground interface. Webbing at corners, robust stake loops, and guyline anchors for wind resistance and load transfer.
Where it shines: quick setup without fiddly pole sections; compact portability; quiet, low-flex interiors in gusts; and reliable weather resistance when pitched and tensioned correctly. For most campers, that combination—speed, stability, and comfort—explains why an inflatable camping tent often becomes the default shelter after a single trip.
Inflatable tents vs traditional tents
Both shelters do the job, but they behave differently in the field.
Setup & learning curve. Traditional pole tents rely on segmented poles, sleeves, and clips; speed depends on familiarity and conditions. An inflatable tent uses beams instead of poles—connect the pump, inflate to spec, stake, then tension. In wind or darkness, fewer moving parts usually means fewer mistakes.
Wind handling. Air beams flex and re-center after gusts, spreading loads across curved geometry. Pole frames tend to localize stress at joints and hubs; once a segment deforms or snaps, the structure can cascade. With inflatables, correct guying and stake placement matter more than brute rigidity.
Rain performance. Either style works if fabrics and seam construction are sound. In practice, inflatable frames don’t “rattle” in squalls, so fly tension stays consistent and drip points are less likely to form—assuming you’ve kept lines taut and angles clean.
Repairability in the field. A puncture in a TPU bladder is patchable with a small kit and alcohol wipes; many systems let you isolate a single beam. A broken pole section needs a splint or a spare, and fiberglass shards are no fun to manage at camp.
Weight & pack shape. Poles can be lighter on minimalist models, but packed shape is often longer and more rigid. Inflatable tents may weigh a bit more due to fabric spec and bladders, yet they compress into a uniform, trunk-friendly bundle with the pump riding alongside.
Failure modes & redundancy. Multi-beam inflatables often remain upright if one chamber loses pressure (reduced stiffness, not immediate collapse). Pole frames are more binary—if a key hub or ridge fails, livability drops fast.
Bottom line: traditional tents reward practiced pitching and careful pole management; an inflatable tent favors fast, repeatable setup and gust resilience, provided you anchor and tension correctly.
Types of inflatable camping tent
Most air-framed designs fall into a few patterns, each optimized for different trips and sites.
Dome (all-rounders). Curved geometry, steady headroom, and predictable pitching on mixed terrain. Domes balance wind shedding with interior volume, which is why families and first-time air-tent users gravitate here.
Tunnel (space-efficient). Linked arches create long, livable bays—great when you want separate sleeping and gear zones. Orientation to the wind matters more, but guyed correctly, tunnels feel quiet and composed in gusts.
Family/basecamp sizes. Capacity and layout drive comfort on multi-day trips. A mid-sized option like the coody 13.6 inflatable tent adds real lounge space for rainy hours, while the coody 10 inflatable tent hits a practical sweet spot for weekenders who still want full-height movement. Compact hub-style frames, such as the coody 8.0 inflatable tent, emphasize fast setup and a tidy footprint when you’re rotating camps often.
Outdoor events & utility shelters. For trade shows, meet-ups, or trailhead logistics, event-oriented air tents prioritize usable frontage, signage, and repeatable setup over uneven ground.
When choosing among types, think in terms of site conditions (wind exposure, drainage), interior rhythm (sleeping vs. shared space), and move frequency (one base vs. multiple hops). That short list usually gets you to the right style faster than comparing specs line by line.

Buying tips: how to choose the best inflatable tent
Start with fit, then validate specs. A dialed-in size and layout will do more for comfort than any single feature.
Quick size cue. Solo or duo weekenders do well with compact footprints and a fast pitch. If you’re weighing a small frame, skim the high-quality coody 8 inflatable tent to benchmark usable headroom and pack size. Need a heat-ready option for shoulder seasons? Look for stove-jack compatibility or prebuilt kits such as a Coody inflatable tent configuration.
Price drivers to watch (beyond “bigger costs more”):
- Fabric spec. Heavier deniers and technical blends add durability and better rain performance but raise price. Look for tight weaves, robust coatings, taped seams, and reinforced stress points.
- Beam architecture. Multi-bay frames feel calmer in gusts and keep livability if one chamber loses pressure. Single-point inflation is convenient; independent valves aid field isolation.
- Flooring. Thick, abrasion-resistant baths with raised edges reduce splashback and grit ingress.
- Ventilation. High/low vents plus mesh door panels manage condensation without cold drafts.
- Hardware. Metal rings, guyline adjusters, big zipper garages, and wide stake loops signal real-world design.
- Repair path. Availability of bladder patches, valves, and fabric swatches matters more than marketing claims.
Materials, briefly:
- TPU bladders inside the beams tolerate flex and cold better than many elastomers.
- Polyester or TC (technical cotton) outers balance UV stability, stretch control, and weather resistance.
- Clear windows (TPU or PVC) add light; check for storm covers when privacy or heat control matters.
Weather & wind. Curved air frames spread loads; performance still depends on pitch: square the corners, tension the fly, and run guylines to solid anchors. A well-set inflatable should withstand heavy rain without drumming or sagging.
Use case filters:
- Move often? Favor lighter canopies, fewer beams, and a compact footprint.
- Stay put? Prioritize interior height, vestibules, and storage loops for multi-day rhythm.
- Cold-weather shoulder seasons? Stove-jack readiness and heat-resistant panels help; always ventilate and follow stove safety.
Checklist before you buy:
- Packed size fits your trunk or rack, pump included.
- Inflates to a clear PSI range; valves are glove-friendly.
- Floor thickness and seam construction match the terrain you camp on.
- Vent layout suits your climate (humid vs. arid).
- Repair kit and spares are easy to order.
- Warranty terms are explicit.
If you’re browsing an inflatable tent for sale, compare total value, not just the tag: fabric grade, beam layout, floor spec, and real ventilation usually explain why two same-size shelters feel very different after the first storm.
Bundles, stoves & add-ons: everything you need for a complete setup
The easiest way to make an air-frame shelter feel “done” from day one is to sort the system, not just the tent. Think in layers: ground interface, structure, heat, light, and repairs. A bundle approach ensures compatibility (valves, PSI range, footprints that actually fit, guying that aligns with beam geometry) and keeps pack lists simple.
Ground & structure
- Footprint/groundsheet. Protects the tub floor from abrasion and helps shed surface water; choose a cut that matches the perimeter so edges don’t channel rain under the tent.
- Stakes & guylines. Carry two stake types (soft soil + rocky) and add a few reflective lines with tensioners for clean fly angles in wind.
- Pump & gauge. Dual-action hand pumps are reliable; a 12V inflator saves time but always finish with a manual gauge to hit spec.
Heat (stove setups)
- Use a proper stove jack and heat-resistant panel; keep clearances around the pipe, add a spark arrestor, and route the flue so prevailing winds don’t backdraft.
- Vent high and low for cross-flow; keep CO awareness high and never run an unattended fire.
- Anchor first, then light: a well-tensioned frame and straight flue reduce hot-spot flutter at the jack.
Lighting & livability
- Small lantern loops and cable pass-throughs tame clutter; warm, indirect light improves evening comfort.
- Awnings/vestibules expand the dry zone for boots and wet gear; window storm covers control glare and privacy.
Repair & spares
- Pack a TPU patch kit, alcohol wipes, valve tool, short spare guyline, and a couple of multi-terrain stakes.
- Mark beam sections with tape tabs so you can isolate and re-pressurize a single chamber quickly if needed.
Organization that travels well
- One “first-out” pouch (stakes, hammer, headlamp, pump gauge) prevents rummaging at dusk.
- Color-code dry bags by zone (sleep, cook, tools) so the interior stays tidy on multi-day stops.
A tent that’s pitched square, tensioned cleanly, and supported by the right small parts will feel quieter in wind, drier in rain, and less fussy at pack-up—exactly what most campers want from an inflatable setup.
Where to find an inflatable tent for sale
Price tracks three things more than anything else: materials, frame architecture, and interior volume. Heavier-denier canopies with thorough seam taping, clear windows with storm covers, and reinforced stress points cost more up front but usually outlast budget fabrics. Multi-bay air frames (with isolation between beams and single-point inflation) add convenience and storm composure; they also add to the bill. Finally, square footage and true standing height scale fabric and beam length—bigger shelters simply use more kit.
When comparing an inflatable tent for sale:
- Fabric & floor spec. Look for denier, coatings, taped seams, and a bathtub floor with raised edge.
- Beam details. PSI range, isolation valves, and repair access to TPU bladders.
- Vent system. High/low vents and mesh doors to manage condensation in shoulder seasons.
- Hardware & small parts. Guyline adjusters, stake loop width, zipper garages—tiny clues to real usability.
- Warranty & spares. Patch kits, spare valves, and clear support channels mean issues don’t end trips.
A practical sanity check: ask whether the shelter you’re eyeing would feel calm during a long, windy night and tidy at pack-up the next morning. Models that score “yes” on both usually justify their price even if they aren’t the cheapest tag in your shortlist.

Care & longevity: maintenance that makes tents last
A little routine keeps an air-frame shelter quiet in storms and trouble-free over seasons.
After-trip checklist
- Clean the tent thoroughly. Shake out grit, wipe mud with lukewarm water and a soft sponge; avoid detergents that strip coatings.
- Inspect the tent. Check seams, guy points, zipper garages, and beam sleeves; note scuffs or loose stitching for a home fix.
Drying & storage
- Air-dry fully (inside and out), crack zippers for airflow, then store cool, dry, and loosely packed. Long compressions fatigue coatings and bladders.
Inflation discipline
- Follow the maker’s PSI range; top off with a manual gauge after any 12V inflator. Over-pressure in direct sun can creep higher—vent a touch at midday if the canopy feels drum-tight.
Valves & beams
- Keep valve caps clean; grit is the #1 slow-leak culprit. If a chamber softens, isolate it (if the system allows), check the valve O-ring, then re-inflate to spec.
Field repair kit (minimum)
- TPU patches, alcohol wipes, a small roller (or firm spoon), spare guyline, and two stake types (soft soil + rocky). Mark beams with tiny tape tabs so you can identify and repressurize a single section quickly.
Pitch habits that extend life
- Square the corners, tension the fly evenly, and run guylines at clean angles—less flap equals less wear. Use a footprint trimmed to the floor to avoid catching and channeling runoff.
Heat use
- If running a stove: use a rated stove jack, maintain clearances, add a spark arrestor, and keep high/low vents open. Never leave heat unattended.
Done consistently, this routine preserves coatings, keeps valves sealing, and prevents the slow creep of moisture and grit that shortens a tent’s service life.
Final thoughts
Pick size and layout first, then validate materials and frame details. Practice one clean pitch at home, carry two stake types, and keep a small repair kit with TPU patches and a manual gauge. On site, square the corners, tension the fly evenly, and run guylines to solid anchors—those habits matter more to comfort than any single spec.
Inflatable beams deliver quick setup and calm interiors when the weather turns; quality fabrics, thoughtful ventilation, and a stable floor plan turn that advantage into day-to-day ease. If you’ve matched capacity to how you actually camp—and prioritized a design that stays quiet in wind and tidy at pack-up—you’ll feel the difference on the first night and every trip after.











Leave A Comment